
Integrating Facebook features into an app is nowadays a quite common task, and one of the most important steps in the integration process is the login functionality implementation. Logging in with Facebook not only allows you to attach a social characteristic into your app, but it can also be used as a login system instead of creating a custom one. By adding it you offer to users a familiar way to authenticate, considering that the majority of users use Facebook.
Facebook integration is natively supported since iOS 6, even though it’s still necessary to manually add the Facebook SDK into your projects. There are two ways provided by the SDK for logging in with Facebook. The first one consists of a relatively easy solution, as it uses a predefined login view which manages all the session and login related stuff. The second one is a more “heavy” approach as everything must be implemented and handled by the developer, but on the other hand the login process can be highly customized. The method that should be used into a project definitely depends on the app’s requirements. If the predefined, familiar Login with Facebook button fits to the application’s look and feel, then this should be the number #1 option. If further customization is needed, then the programmatic option is a one-way road.
In this tutorial we are going to see how to login with Facebook using the first way, so let’s talk a bit more about it. The login view, or programmatically speaking the FBLoginView class, provides a standard Facebook button to log in and log out from the app. The appearing position of the view can be specified, but neither its size or its title can be changed. Actually, the title is automatically set according to the logged in status at a given time. Behind the scenes, the class is responsible to carry out all the heavy work. It manages all the communication with Facebook, it handles the various session changes, it persistently stores the authentication token received from Facebook after a successful login, it checks for an existing token upon the application launch, and a lot more. Developers don’t have to deal with all that details, or even care about them. They are only required to add the login view to the appropriate view controller, define all the desired permissions and implement a few delegate methods to handle the login state changes.
The login with Facebook relies on the Single Sign-On (SSO) access control system, according to which users can access multiple applications having logged in just once and using the same session. If, for example, you have the Facebook app installed on your device and you have already logged in, then when you’ll use for first time another application that implements the login with Facebook feature you’ll see that you’re already connected and no credentials are required again. You’ll only need to authorize the app. The basic idea behind this, is the fact that a device (such as the iPhone) is personal, so users are not obliged to provide the login info repeatedly. There is a drawback though; when you log out from an app you actually just de-authorize its access to your account. You are not really disconnected from Facebook, so even if you expect so, no credentials will be asked the next time you’ll use the app. In that case, you have to explicitly logout using the Facebook app or through the iPhone/iPad settings.
By finishing this tutorial you’ll be able to login with Facebook and to use the method you will learn in your projects too. However, I would strongly advise you to read the official Facebook documentation regarding the login workflow and the Single Sign-On technology. Doing so will also help you to obtain a deep understanding on the current topic.
App Overview
Looking at the big picture of this tutorial, one could say that is separated in two major parts. The first one is dedicated to the preparation needed to be done both in Facebook and Xcode prior to any implementation. In this, we will see how to create an application record on Facebook, how to setup Xcode and add the Facebook SDK framework, and how to use information taken from the newly created Facebook record to the project. Once this necessary step is over, we will be devoted to the implementation. By implementing a sample project, we will see how the login view and theFBLoginClass work by logging in and out. Finally, we will implement all those needed delegate methods that will inform our app about the connection state, and we display specific user information on-screen.
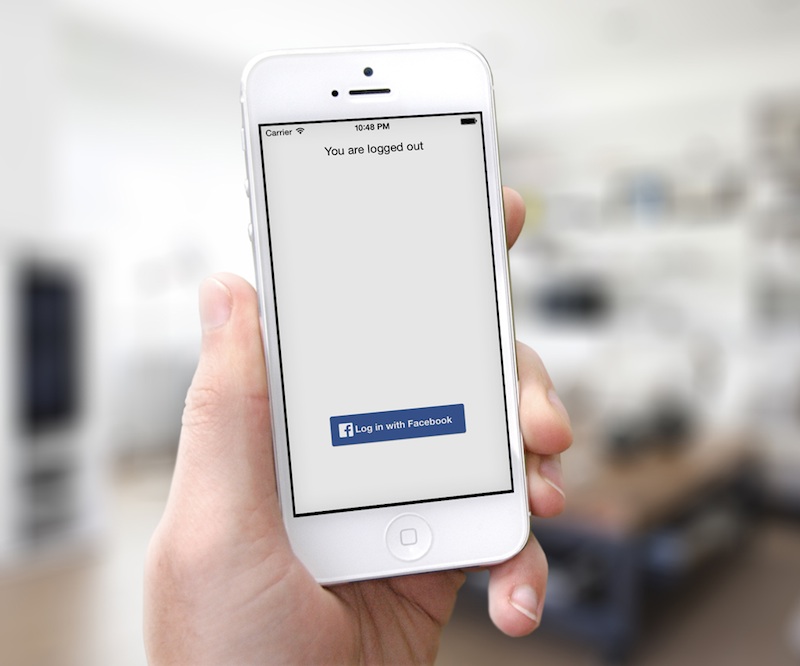
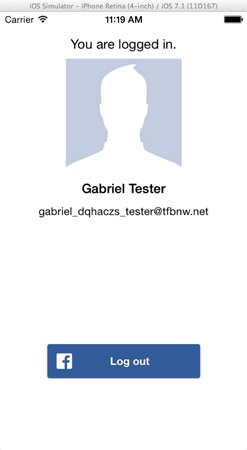
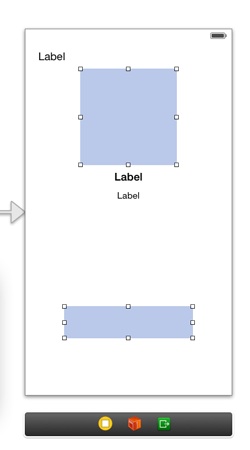
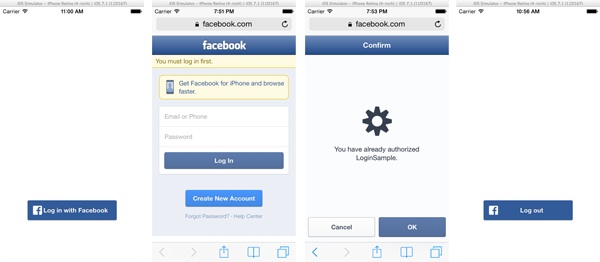
The next figure gives you an idea of the final goal of this tutorial.
Notice that if you download the sample project, you must perform some preparatory steps before you run it. Specifically, you must firstly set your own Facebook app’s info in the project’s .plist file. Be sure to correctly enter your app’s FacebookAppID, FacebookDisplayName string values and the URL Types array. If you skip it, you won’t be able to try out the sample project. Also, you must necessarily to add the Facebook SDK framework to the project. To accomplish all these, follow the guidelines described in thePreparing the Environment section.
Project Creation
Let’s start working by launching Xcode and creating a new project for the sample application, as it’s shown in the next figure:
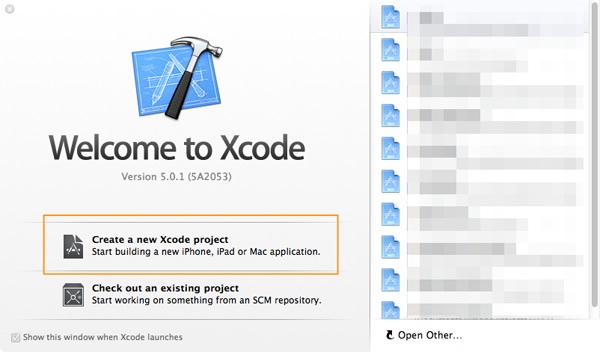
In the guide that appears, select the Single View Application in theApplication category, under the iOS section. Click on the Next button to proceed. In the second step, enter the LoginSampleFB value in the Product Name field, and make sure that in the Devices drop down menu the iPhoneoption is selected.

Click on the Next button once again, and in the last step select a directory to save the project. Once you do so, click on the Create button and you are ready.
Preparing the Environment
Before using any Facebook SDK feature, it’s necessary to perform some prerequisite tasks. These include preparation on both the Facebook platform and the Xcode project, as well as adding the Facebook SDK framework on the app. Of course, you must have a Facebook account active. In case you don’t, then create one and then return here to continue.
For starters, open Safari or any other browser you use, and go to theFacebook Developers website. Click on the Log In link at the far right side of the screen, and in the next page enter your credentials.
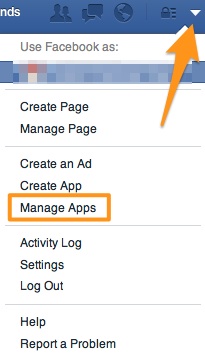
After you have logged in, you will be probably guided to your Facebook home page. In this case, at the top bar, click on the most-right link with a down arrow image, and from the menu that will appear select the Manage Appsoption.
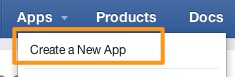
Next, from the top menu again, click on the Apps and then on the Create a New App option. As I have already said, for the purpose of this tutorial we are going to create a sample application which you can delete later.
In the window that pops up, in the Display Name field enter theLoginSample value as the app’s name. Also, in the Category drop down menu select any category you want, just don’t leave it with its default value. As you see in the next figure, I set the Education value.
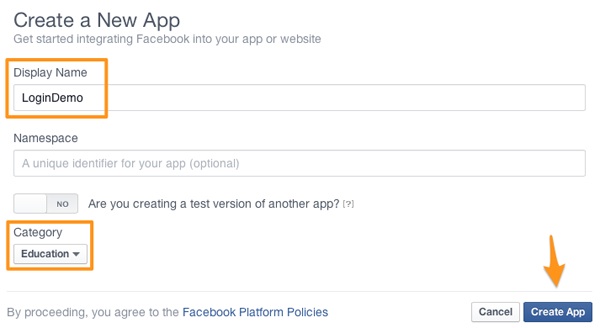
Click on the Create App button, and then enter the captcha code you see on your screen in the security check window. Once you’ve finished, the new app will be created and you’ll be guided to the app’s dashboard.
The next step is to enable the app login from iOS. Click on the Settingsoption in the left menu, and in the main area click on the +Add Platform big button.
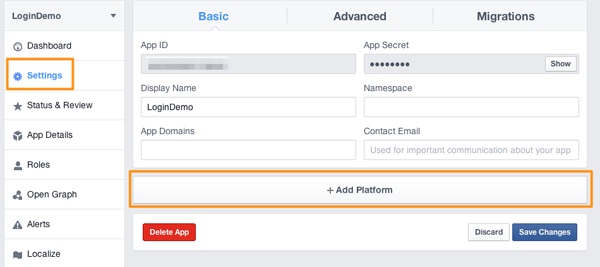
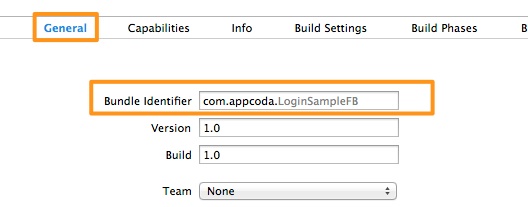
In the new window, select the iOS platform. A new panel is appeared on the dashboard titled iOS. In the Bundle ID field, it’s very important to enter theexact same to the project’s Bundle Identifier value, otherwise the app users won’t be able to be authorized. So, go back to Xcode, click on the project target on the Project Navigator pane, and under the General tab copy the value of the Bundle Identifier field.
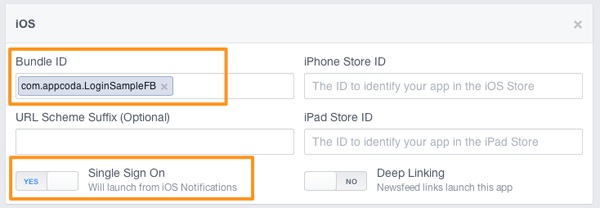
Return on the Facebook dashboard, and paste or type the Bundle Identifier in the Bundle ID field. Also, make sure to enable the Single Sign On toggle button. Finally, click on the Save Changes button and this step is ready. Don’t logout from the dashboard though, as we have not finished yet.
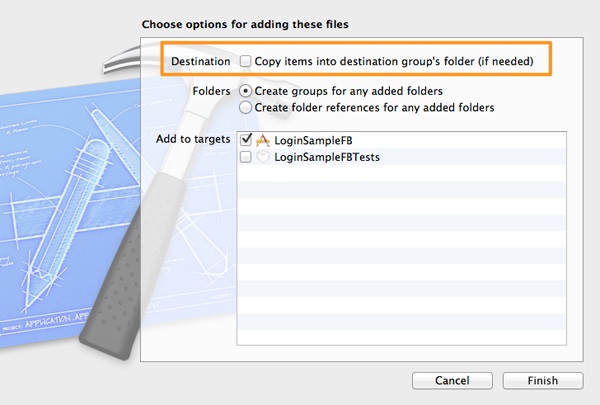
Next, visit this link, download the Facebook SDK for iOS and install the package following the instructions shown on-screen. By default, the package is extracted on the Documents directory of your user account on your computer. You can either leave it there, or move it to another directory. In this tutorial, I presume that the SDK resides in the ~/USER/Documents directory. Once you have finished with the package extraction, open theFacebookSDK directory, and then drag and drop the FacebookSDK.framework on Xcode, under the Frameworks group. In the modal window that Xcode presents, unselect the Copy items into destination group’s folder (if needed) checkbox, so the framework won’t be actually copied on the project, just a reference to it to be created. By doing so, when you download and extract a new version of the SDK your project will be automatically updated when you re-open it. Leave the rest of options as they are, and click on the Finish button.
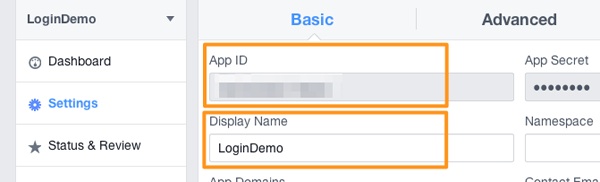
There is one final step needed to be performed, and that is to add three new keys to the project’s .plist file. So, open it by clicking on the Supporting Files group in the Project Navigator and then on the FBLoginSample-Info.plist file. Add a new key named FacebookAppID, and as its value paste the App ID value which you can copy from the Facebook dashboard, at the top of it. Similarly, add the FacebookDisplayName key, and in its value paste the Display Name which you can also copy from the dashboard.
Finally, create a new key named URL Types, and set its type to array with one item only. Give it the URL Schemes title and make it an array too. In the one and only item that should be contained, set the app ID value you copied from the Facebook dashboard, prefixing it with the fb literal. The next figure illustrates all the three additions on the .plist file:

All steps described here are mandatory for every app that is supposed to integrate Facebook features.
Creating Test Users
During the development stage of an app, and especially when authentication is involved in it, it’s generally a bad habit to use your normal account to perform all the required testings. Thankfully, Facebook supports the creation and usage of fake, test users per app. These users can’t harm your account, and of course, they can be deleted at any time, usually after the app has been developed. You can create as many of them as you want, you can “baptize” them as you want or let Facebook compose random names, and you can assign to a test user other test users as friends. You can even login to a test user’s account if it was a normal user.
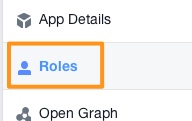
To create a test user (at least) for the sample app that we will implement here, go to the Facebook dashboard of the LoginSample app, and select the Rolesoption at the left menu.
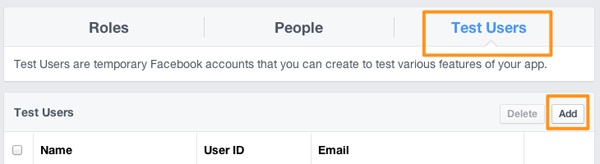
In the main dashboard area, click at the Test Users link at the top of it, and then click on the Add button, as you see in this figure:
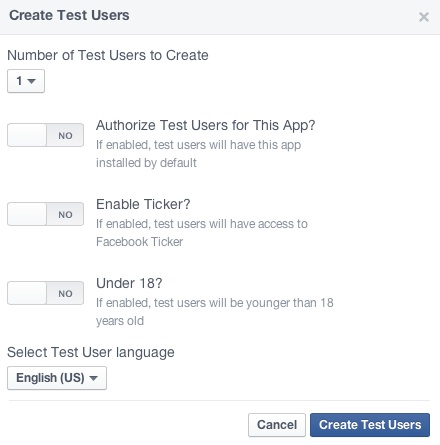
A small window is appeared, where you set the number of test users you want to add, as well as some other options. If you want to create just one user, leave everything as they are and simply click on the Create Test Usersbutton.
You could skip the creation of a new test user in case Facebook adds one by default, named Open Graph Test User. Anyway, here is the list of test users as they are shown on my dashboard, where everything has been automatically created:
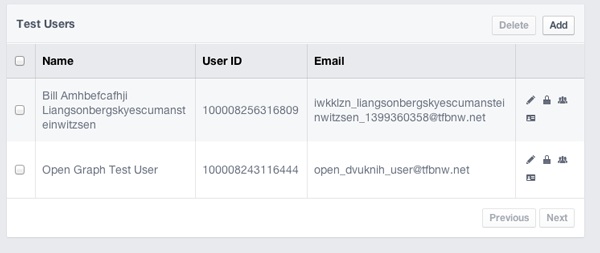
At the right of the test users there are some options, which you can use to rename them, login to their fake account or add friends. Feel free to use them and see what they are for.
Later on we are going to use the e-mail address of a test user to login with Facebook. As a last word, I would recommend to edit the test user you’re about to use and set a password, so you won’t encounter any problems during the login process.
Interface Setup
All the required preparation has been done, so we are now ready to proceed to implementation. As I have already said in the introduction, we are going to add a pre-made view, existing already built in the Facebook SDK. This view is based on a class named FBLoginView, and it has two advantages:
- It automatically displays the log in/log out Facebook button depending on the connection state.
- It handles all the session related stuff, connection states and basic data fetching under the hood.
From the developer’s point of view, using the login view consists of a two-step process in general. The first one includes all the necessary tasks needed to be done in order to display the view, and the second involves the implementation of some delegate methods for handling all changes been made on the login and session state.
In the default view of the ViewController class we are going to add various subviews, and the most of the will be used to display the user’s information after a successful login. Specifically, the most important subview that we will add is the login view, which actually is the login button. Further than that, we will use three UILabel objects to display:
- The current login status.
- The user’s name.
- The user’s e-mail address.
Finally, we will have one more UIView object to show the user’s profile image. When the user is logged out, the all labels and the profile picture view will be hidden, with just one exception; the login status label.
Let’s get started by opening the Main.storyboard file. Add the following subviews to the View Controller scene:
- UIView
- Frame: X=60, Y=430, Width=200, Height=50
- UILabel
- Frame: X=20, Y=32, Width=280, Height=21
- Text Alignment: Center
- UIView
- Frame: X=85, Y=61, Width=150, Height=150
- UILabel
- Frame: X=20, Y=219, Width=280, Height=21
- Text Alignment: Center
- Font: System Bold
- UILabel
- Frame: X=20, Y=248, Width=280, Height=21
- Text Alignment: Center
- Font Size: 14.0
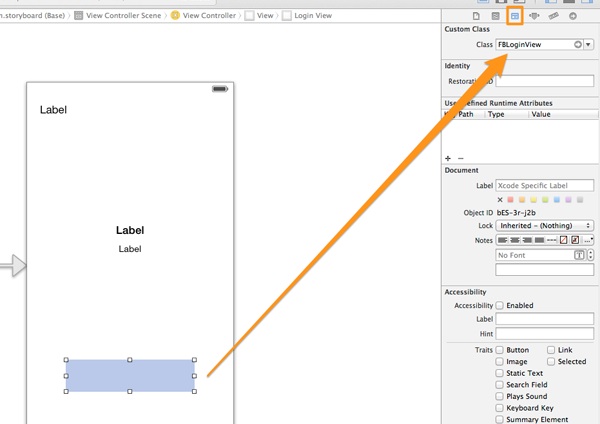
In order for the two UIView objects to properly work, we must modify their classes and set the Facebook-related ones. Specifically, for the UIView at the bottom of the interface (#1 in the above list), in the Class* field of theCustom Class** section in the Identity Inspector, we must set theFBLoginValue, as shown below:
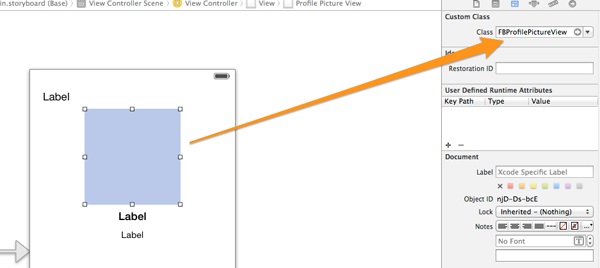
For the profile image view, meaning the second UIView object (#3 in the list above), we must set the FBProfilePictureView as its class name:
Setting these custom classes to the above views is not enough to make them work as expected. One more touch is required, and that is to make a call to both of these classes in the application:didFinishLaunchingWithOptions:method of the AppDelegate class. However, we must import the Facebook SDK libraries to the class firstly, so open the AppDelegate.m file and add the next command at the top of it:
1
|
#import <FacebookSDK/FacebookSDK.h>
|
Now, go to the AppDelegate.m file and in theapplication:didFinishLaunchingWithOptions: delegate method add the next two lines:
1
2 3 4 5 6 7 8 9 |
- (BOOL)application:(UIApplication *)application didFinishLaunchingWithOptions:(NSDictionary *)launchOptions
{ // Override point for customization after application launch. [FBLoginView class]; [FBProfilePictureView class]; return YES; } |
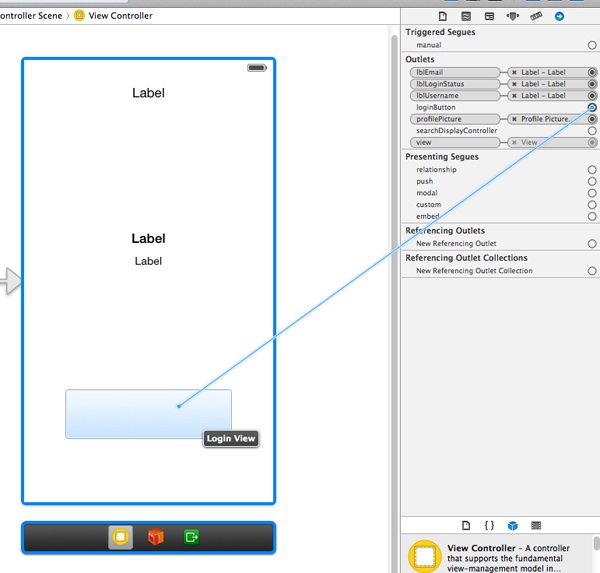
Now that the first contact with the Facebook SDK has been made, let’s create some IBOutlet properties for the subviews we added to the interface, and then we’ll make the connections. Open the ViewController.h file, and add the next property declarations:
1
2 3 4 5 6 7 8 9 10 11 12 13 |
@interface FirstViewController : UIViewController
property (weak, nonatomic) IBOutlet FBLoginView *loginButton; @property (weak, nonatomic) IBOutlet UILabel *lblLoginStatus; @property (weak, nonatomic) IBOutlet UILabel *lblUsername; @property (weak, nonatomic) IBOutlet UILabel *lblEmail; @property (weak, nonatomic) IBOutlet FBProfilePictureView *profilePicture; @end |
Of course, you should import the Facebook SDK library here as well:
1
|
#import <FacebookSDK/FacebookSDK.h>
|
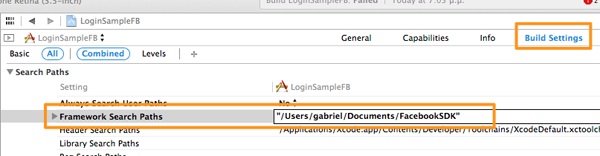
Note: It’s possible for Xcode to issue some errors, even when you import the above file. That’s probably caused because Xcode does not correctly “see” the path to the Facebook framework. There is a workaround for that:
- Go to the project target and open the Build Settings tab.
- Scroll down until you find the Search Paths section
- Click on the Framework Search Paths key and press the Return key on your keyboard to edit the value.
- You should see something similar to this: $(inherited) /Users/gabriel/Documents/FacebookSDK. Delete the $(inherited) term, and include the remaining string value in double quotes, just like it’s shown in the next figure:
Finally, go to the Main.storyboard file and connect all IBOutlet properties to the appropriate subviews. Specifically, be sure to match:
- The loginButton property to the FBLoginView view at the bottom side of the scene.
- The lblLoginStatus property to the first, top-most UILabel.
- The lblUsername property to the second UILabel where the logged in user’s name will appear.
- The profilePicture property to the FBProfilePictureView view.
- The lblEmail property to the last UILabel object.
Logging In and Out
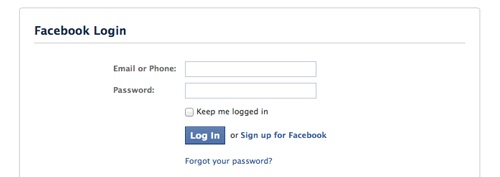
By simply doing all the previous preparation, the login view is ready to work. When the login button will be tapped, the user credentials must be given in order to get authenticated. This can take place in two ways: Either through the Safari app, or through the Facebook app if it is installed on your device (note that the Facebook app works only on a real device, not in the Simulator). Once the login info has been provided, our app must take the control again, but besides that, the Facebook SDK must handle and determine the login process.
Therefore, before we give a try to the app, we must add the necessary code that will do the above. First of all, open the AppDelegate.m file and add the following delegate method:
1
2 3 |
The iOS will call this method after the user has authorized the app through Safari of the Facebook app. In here we will add just one line to let Facebook SDK handle the login result and modify the login view accordingly. Behind the scenes, the authentication token received by Facebook will be persistently stored, and the session state will get changed.
In the next code fragment, you see the necessary code added in the above method that handles the login process:
1
2 3 4 5 |
Additionally, we must take care so all subviews to be hidden until the logged in state is determined, except for the login status label. They should become visible only after a successful login and after their values have been set, otherwise they must remain hidden. We’ll create a small private method to accomplish this. Open the ViewController.m file, and in the private class section add the next declaration:
1
2 3 4 5 |
@interface ViewController ()
-(void)toggleHiddenState:(BOOL)shouldHide; @end |
Next, define that method:
1
2 3 4 5 |
-(void)toggleHiddenState:(BOOL)shouldHide{
self.lblUsername.hidden = shouldHide; self.lblEmail.hidden = shouldHide; self.profilePicture.hidden = shouldHide; } |
It’ obvious that the shouldHide parameter value defines the hidden state of the subviews. Now, let’s call it in the viewDidLoad method, so initially the subviews are hidden. Also, along with the call to this method, we will set the empty string as the login status label text value:
1
2 3 4 5 6 7 8 9 |
- (void)viewDidLoad
{ [super viewDidLoad]; // Do any additional setup after loading the view, typically from a nib. [self toggleHiddenState:YES]; self.lblLoginStatus.text = @""; } |
It’s always necessary to specify the read permissions you want for your app when logging in with Facebook. The Facebook SDK uses by default thepublic_profile permissions, independently on whether you specify or not any. Using it, the user’s public info (such as name, profile picture, friends, etc) is returned. However, even though the SDK uses the public_profileautomatically, it is recommended to specifically set it along with any other permissions you want to ask for. In this sample app we want to get the user’s e-mail address as well, therefore the email permission is required too.
Right next it’s shown the way you can use to specify the permissions you need. Note that you must add it to the viewDidLoad method:
1
|
self.loginButton.readPermissions = @[@"public_profile", @"email"];
|
As a footnote, in case you want permissions other than for the public profile, the user’s e-mail address and the friends list, or if you need post permissions, your app must be approved by Facebook before it goes live to the App Store. If it won’t be approved, the Facebook-related features won’t work when your app is live.
Build and run the app now for first time. Tap (or click) on the Login with Facebook button, and be prepared to enter your credentials. In a previous section of the tutorial we talked about test users, so I would advise you to use such an account in order to make your testings. When you’ll go back on the app, you will see that the login view title has changed to Log out. Nothing else happens yet, but that’s something we’ll fix next.
Note that if you test the app on a real device and you have the Facebook app installed, then in case you have logged in with Facebook through that app, you won’t be asked again to enter your credentials, just to authorize the app. That’s the meaning of the Single Sign-On after all.
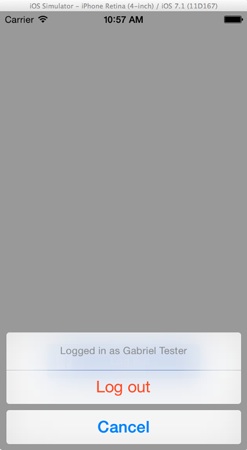
If you try to log out, an action sheet asking for confirmation will appear, as shown below:
Handling States
If you have successfully logged in and logged out, then you see that the login view makes it really easy to get connected to Facebook. For the time being though, the only thing that gets changed is the button’s view, nothing else. In this section, we will add all those required delegate methods that will enable us to know if we are connected or not, and then display or hide the appropriate information.
There are four delegate methods that should be implemented in total. Before we add any of them, we must make our class, the ViewController, to conform to a certain protocol, the FBLoginViewDelegate. Open the ViewController.hfile, and in the header line adopt the protocol, just like it’s shown below:
1
|
@interface ViewController : UIViewController <FBLoginViewDelegate>
|
Now, open the ViewController.m file, and before the implementation of the delegate methods, let’s make our class the delegate of the login view. Simply go to the viewDidLoad: method and add this line:
1
|
self.loginButton.delegate = self;
|
Let’s focus now on the delegate methods. The first one we’ll talk about, it is called when the user is logged in. Using it, we can change the hidden state of our subviews, and set the current login status value. Right next it’s shown its implementation:
1
2 3 4 5 |
-(void)loginViewShowingLoggedInUser:(FBLoginView *)loginView{
self.lblLoginStatus.text = @"You are logged in."; [self toggleHiddenState:NO]; } |
Two simple tasks are performed here: The appropriate message is set as the text of the status label, and the rest of the subviews are becoming visible.
Now that both the profile picture view and the username label can be shown when we have logged in, they must be assigned with values too. This will take place to another delegate method, which provides us with the info we want. That method contains a FBGraphUser object as parameter, which actually is a NSDictionary object, and it contains all the public info of the logged in user. Here is the implementation:
1
2 3 4 5 6 |
-(void)loginViewFetchedUserInfo:(FBLoginView *)loginView user:(id<FBGraphUser>)user{
NSLog(@"%@", user); self.profilePicture.profileID = user.id; self.lblUsername.text = user.name; self.lblEmail.text = [user objectForKey:@"email"]; } |
I intentionally added a NSLog command in the above method, just to let you see the data contained in the user object. By assigning the id property as the profile ID in the profile picture view, the Facebook SDK downloads the appropriate picture and displays it. If no user picture has been specified, then the default image of the Facebook user will be used. Lastly, the user’s name and the e-mail address values are set to the appropriate labels.
With the above two delegate methods, we managed to handle case where the user has logged in. Now, we must deal with the log out. For this case, there’s another delegate method, in which we will simply change the status text on the status label and we will hide the rest of the subviews. Here it is:
1
2 3 4 5 |
-(void)loginViewShowingLoggedOutUser:(FBLoginView *)loginView{
self.lblLoginStatus.text = @"You are logged out"; [self toggleHiddenState:YES]; } |
There is one delegate method remaining, and that is to handle any errors that may occur. In this sample, we won’t do any actual error handling, we’ll just display the error on the debugger. However, in a real application you should handle all errors according to your app’s requirements.
1
2 3 |
-(void)loginView:(FBLoginView *)loginView handleError:(NSError *)error{
NSLog(@"%@", [error localizedDescription]); } |
With the above four methods implemented, you can test the app once again. This time, when you have logged in, you’ll see the user’s name, the profile picture and the e-mail address displayed on the view.
Summary
Login with Facebook consists of one of the best solutions when you need to add a SSO-oriented login system to your app. By performing some simple steps as described in this tutorial, you gain multiple advantages: You get rid of the hassle to create your own login and authentication mechanism, and you offer your users a familiar technology to work with. Featuring well-known experiences surely leads to more attractive apps, and more potential users. Social apps cover a big part of the available app spectrum, and knowing how to deal with Facebook login and Facebook technologies in general is almost mandatory. Closing, I hope this tutorial to be beneficial to all, and that you’ll add what you’ve learned here to your code toolbox.
For your reference, you can download the complete Xcode project from here. As always, leave me comment if you have any question or feedback.